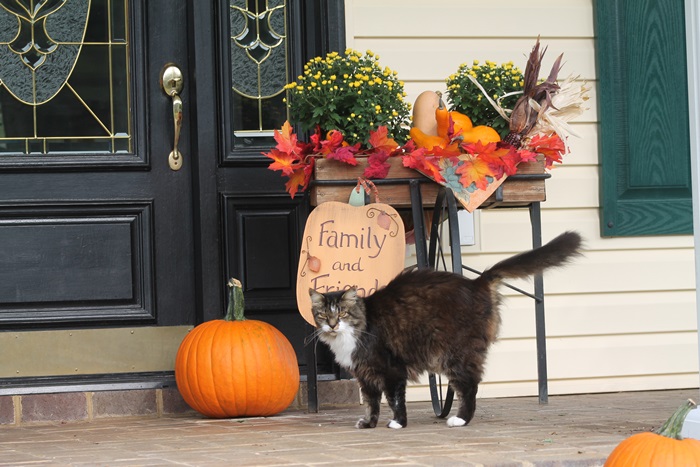
We have a busy week ahead. Both my nephew and his fiance and our son and daughter-in-law are visiting. Different days but in the same week. Following that, I have a friend coming for a week. This is all good as I’ll be working hard to get things done. Motivation. This weekend for instance…my front porch went from this…
To this…my little grapecart is looking very fallish, and look who’s in this picture…
And what do you think he’s doing in this picture?
I wish he’d just have told me how he felt about my fall porch project instead of peeing on it. Thank goodness he didn’t hit the pumpkin I artfully hung from the cart. I’m not even sure he pees..he just sort of “twinkles” his tail like he’s peeing but most of the time, nothing happens. He’s pretend peeing.
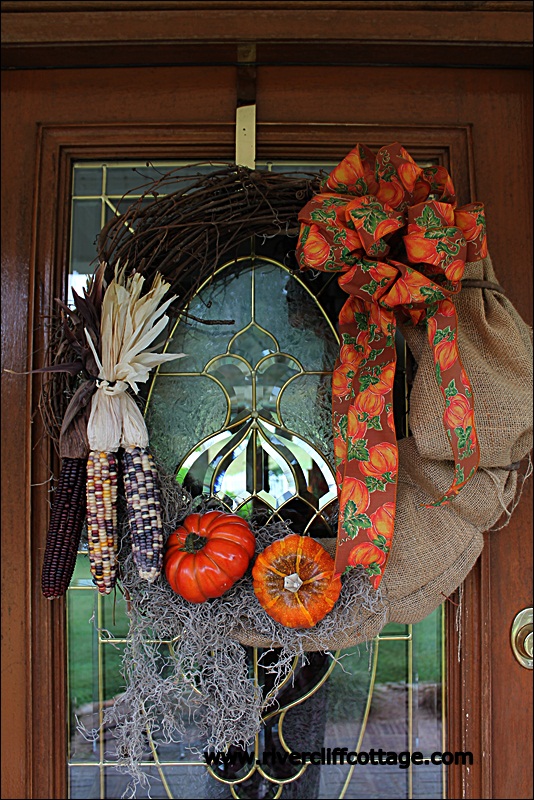
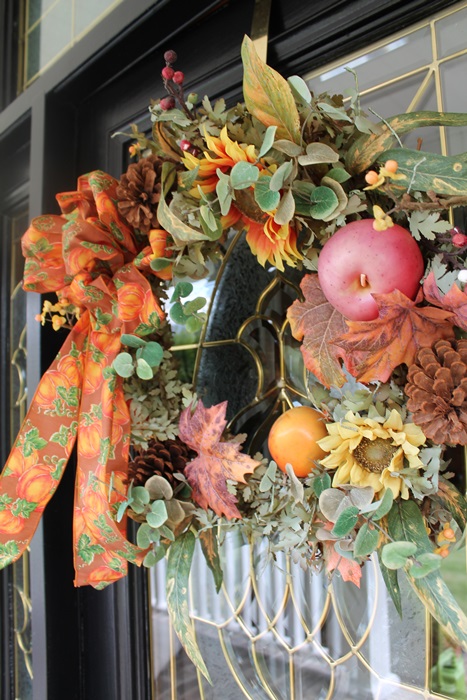
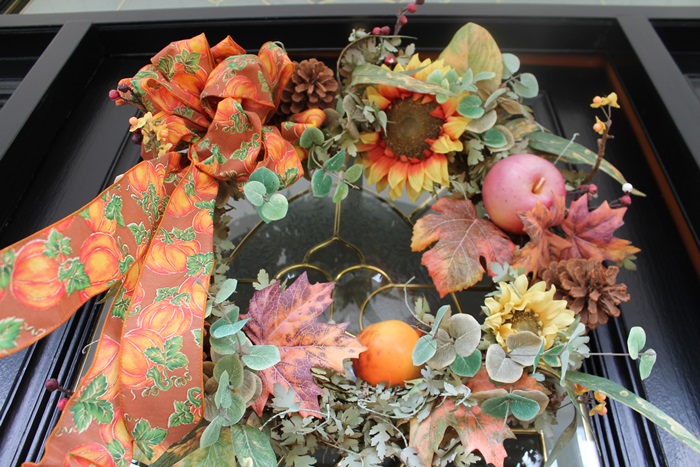
And I decided not to use the wreath I made last year which has breasts…I call this my “Dolly wreath” after Dolly Parton.
Since Dolly is not coming out, I used an old wreath that I had ten years ago. It’s not what I would buy today, because it’s a little busy. Still…I like it fine for this door. It’s a little faded so I put a ribbon on it which, of course, makes it even more busy. If you’re going to be busy, you might as well go for really busy.
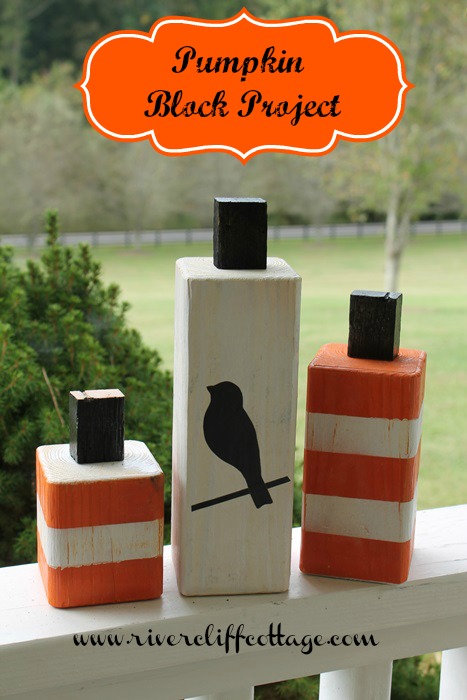
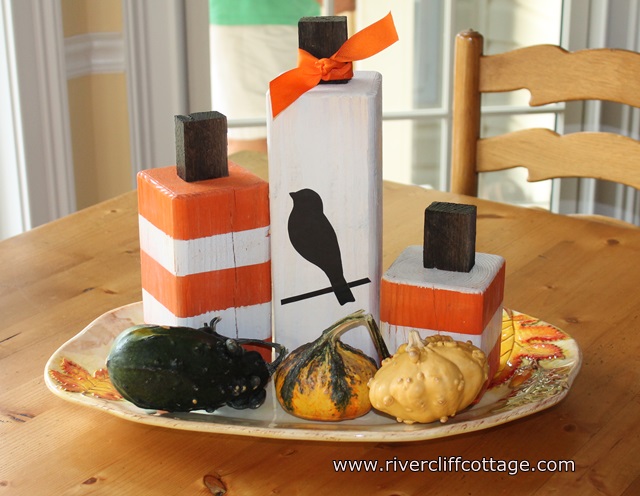
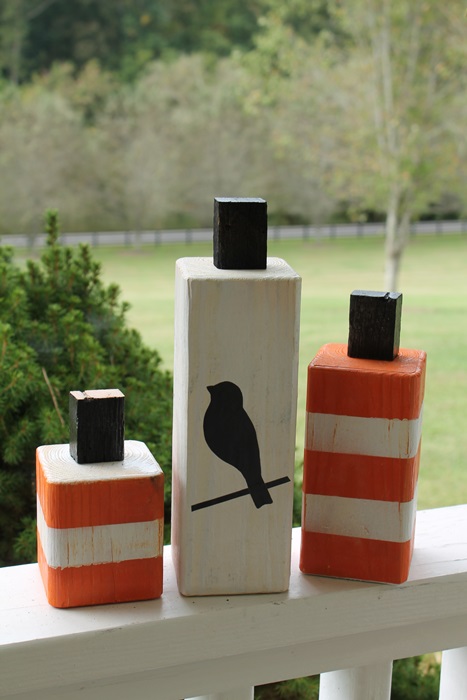
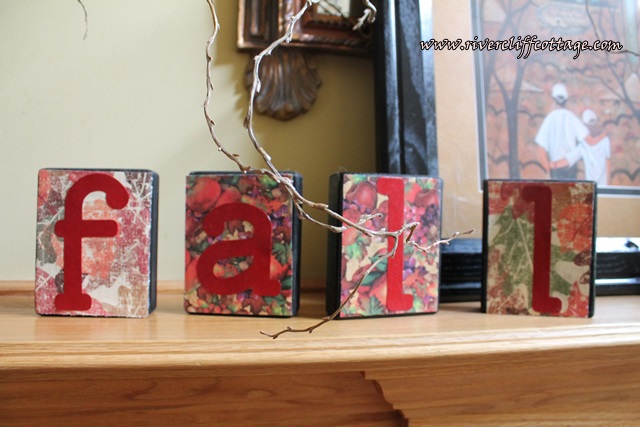
I love these little pumpkin blocks. I was searching around Pinterest when I could not sleep last week and was inspired to try these blocks. The Pinterest post was by a blogger named Kierste. You can find Kierste’s blog with lots of good ideas at www.simplykierste.com.
I like them in the kitchen…keeping it simple.
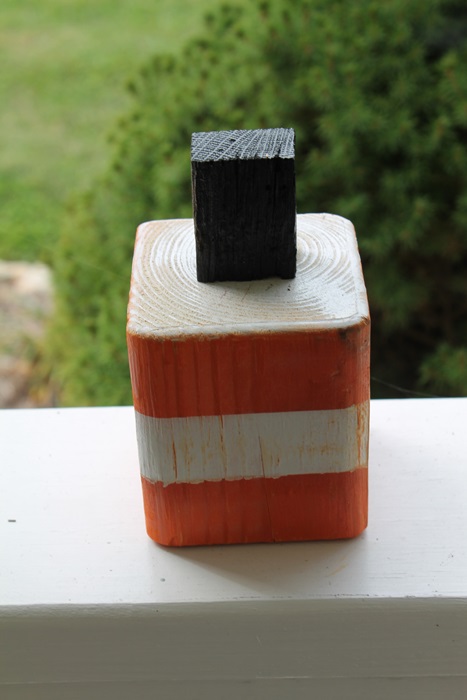
Here’s a short, square pumpkin…
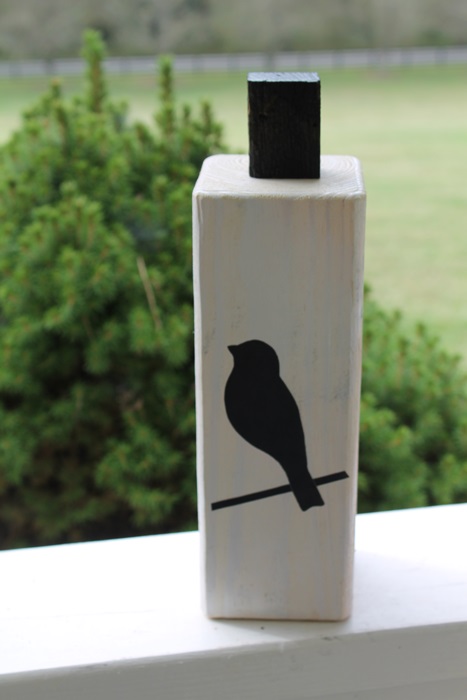
I left the 10 inch block white, and since I had some vinyl birds left from another project, I added that. Did you know that Mendota, Virginia (where I live) is one of the “Top Ten” places in the United States to count hawks…volunteers counted 4076 this month. Here’s the big block….
And here they are again…all together.
This was a very easy project requiring only the following materials:
1) 4 x 4 fence post cut into 10 inch, 7 inch and 4 inch lengths. There will be lots of fence post left over if you want to keep going.
2) Painter’s tape
3) Orange and white spray paint
4) Vinyl art or letter if you want that kind of thing
5) Small blocks or any other item you can find that will resemble a stem
6) Sand paper or steel wool (whatever you have on hand)
Your blocks will be a little rough after the cut, so you’ll want to sand them. Spray paint your blocks and stems. When dry, add the tape and spray paint the blocks with the alternate color. Remove tape, sand lightly, and your project is finished unless you wish to add a piece of decorative vinyl.
It’s fall…and I love looking at fall craft ideas. Follow me over to Layla’s “The Lettered Cottage” and see hundreds of ideas submitted by bloggers. There will be something that you’ll see and want to do!!
Update…our truck will be fixed today from where we had to break in. Read about that here. I thought it would be weeks!
Luckie cannot wait…she needs her “ride” to be rollin’! And “Please,” she says…”don’t lock us up and not be able to get in again…it was scary with you hammering on my window, Mommy!”
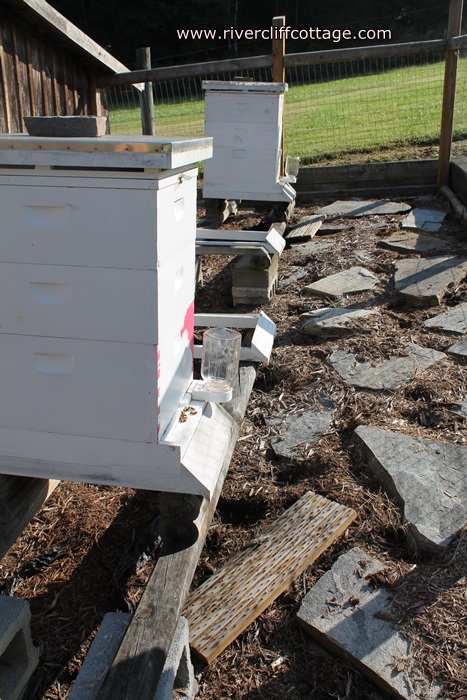
I went outside early this morning to visit the honeybees and found the “welcome mat” for the skunks was askew. Those little stinkers, and I mean stinkers, have been back in the bee enclosure trying to get the bees. I fixed it and that…my friend…is the only thing I got accomplished today. I should have just went back inside and crawled in bed.
Later, I went to Kingsport for a 11:00 am appointment. Messed up my whole day. I need to get my work done in the morning, because by afternoon, I’m not very energetic. So…on the way to Kingsport, I listened to NPR about the debt ceiling and the government shutdown — neither of which I understand. Just the very sound of these things makes me want to run out and buy a year’s supply of toilet paper. Single ply so that it will last longer!!
Here’s a few of my unfinished projects…which I’ll have done by Sunday evening.
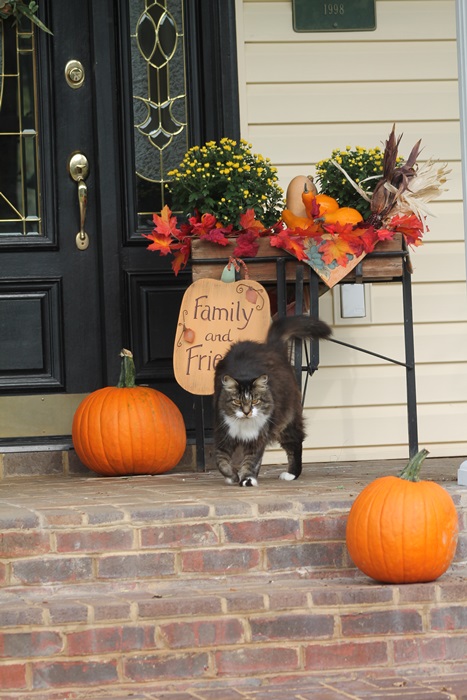
1) Do something for the front door. Or should I just leave the lone punkin’ lying in the little cart?
Do you remember last year when I made the wreath and then stepped back and realized it looked like two boobs? I may get that back out.
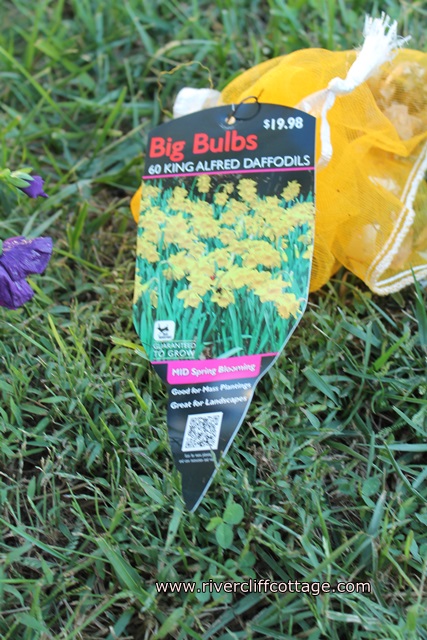
2) Plant 60 King Alfred daffodils, and by the way, what a stupid name for a daffodil.
3) Finish this little block pumpkin project. These have the beginnings of something cute. Maybe.
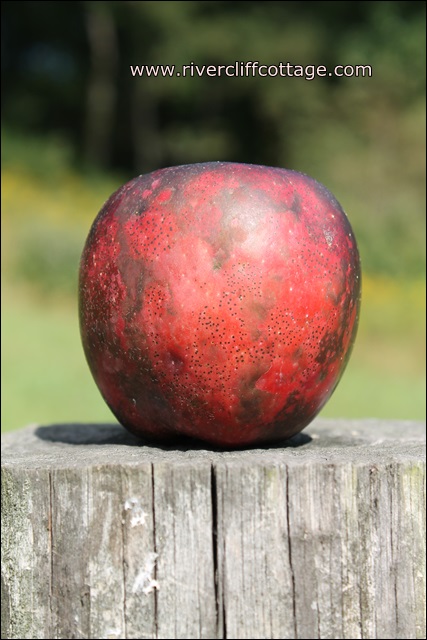
4) Make the darned applesauce. These apples are yelling at me everytime I walk by them and there’s many more on the trees that need to come down. Here’s one of the big mouths on the fence post.
5) Plant the pansies I bought in a moment of madness. I bought 36 pansies, and I’m not sure I even like them. They were so pretty in the big flat, but now….what was I thinking?
And I’m going to sit out in the front porch and look at the pretty view after all this is done.
September is almost through, and we are cleaning up around here. Really enjoying the fall day. I love mums that return each year. These are several years old…when they get like “sticks”, we cut them back and toss some mulch over them for winter. Then we do it all again the next year!
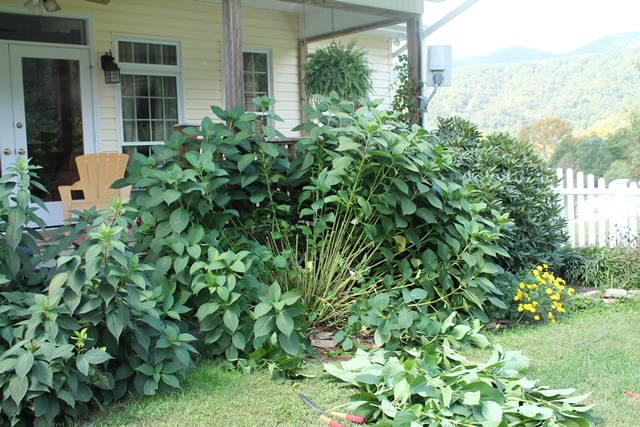
My backyard had a hideous bush–can you believe this? Mike kept saying he’d get around to it. I knew if I started it, he’d finish it and this worked out well. I just went out there and started whacking at the giant hydrangea. It will NOT be back next year. It’s a hydrangea that outgrew it’s spot. Got too big for its britches so to speak. Can you believe I let this exist in my rear yard…all summer long? Ugh.
Here’s how this looks after Mike, Oth and I participated in its haircut. Either later this year or very early next year, the root system of the hydrangea will be removed. The rhododendron bushes that are left will get trimmed next year after they bloom — they are getting huge, too. Everything grows like crazy in Southwest Virginia.
I like it when something “improves” and this was an improvement for sure. Here’s another picture–and in this one, you can see where our internet receiver is. We get internet from the Clinch Mountain Fire Tower. We suffered through Hughes Net for way too long. And look…you’ll see the “knob” part of the mountain right there in the side of the picture. The mountain comes down…there’s a valley and then there’s a rise which we call the knob.
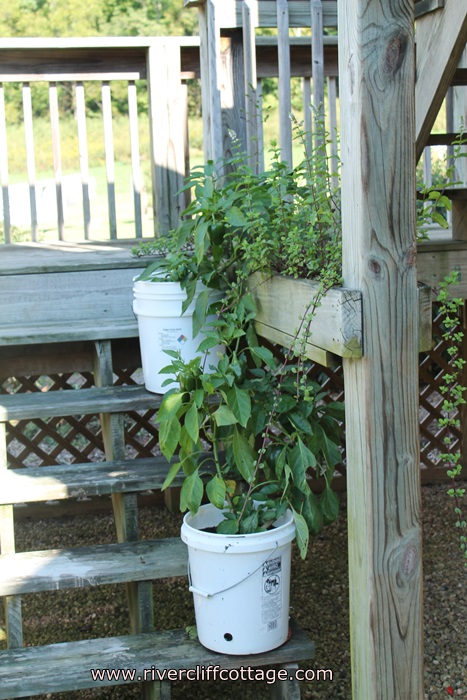
And speaking of growing….do you remember the tomatoes I planted in Five Gallon Buckets? I blogged about that here. It was one of the most viewed pages on RiverCliff Cottage that month, and the post was a feature on Home Talk. . The tomatoes did great, but today we dumped out the dirt and put the buckets away for next year. One thing I will do differently is add some perlite to the soil for water retention. The composted soil in the buckets drained so well that for the tomatoes to thrive, they needed to be watered twice per day.
It was very nice having the tomatoes close to the house for picking. As it turned out they were all cherry tomatoes but that’s okay.
I still have a few green peppers in the five-gallon buckets and I’m leaving them in the buckets through the winter–although I’m moving them inside before the first frost. I’ve read that if you overwinter the plant, you’ll have red peppers earlier. It’s a test. That’s mint hanging over by the buckets. It smells so good when I break it off and bring inside.
In the country, fall is so much more than just pretty colors. It’s work…harvesting…and very rewarding.
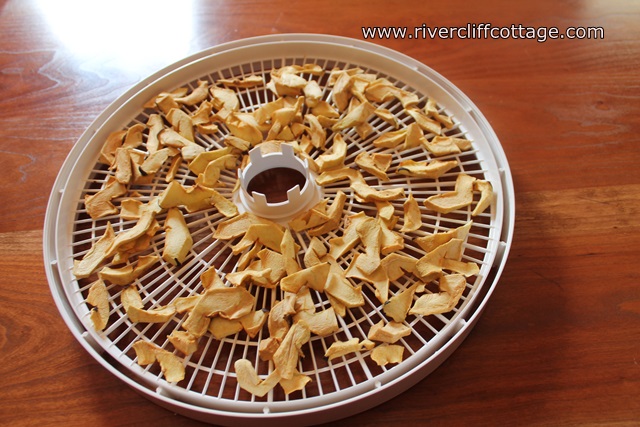
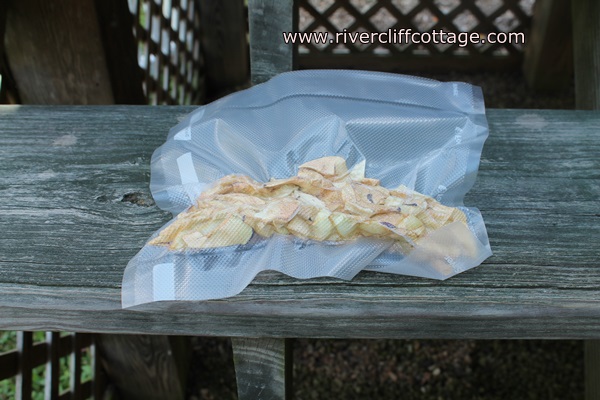
Yesterday I worked in apples. Each day I’m trying to do something with all of these apples we have. Yesterday was “dried apple” day and today was meant to be “applesauce” day.
Last night I was blissfully drying my apples. The kitchen was clean and there was a nice “appley” smell as well as the comforting hum of the dehydrator. I’m feeling good…blissful. And, see that Pal’s cup of tea? Ahhh…if you drink Pal’s tea, you know the good feeling! If you don’t live here, I’m sorry.
But that was interrupted. Abruptly. Loudly. Panic. Mike came in and told me that he’d accidentally locked the truck up with both sets of keys in it. With our two dogs in it. Our dogs who are 15 and we love so much. Thank goodness it was a cool evening. We had to do something that I can tell you is very hard to do. No coat hanger would work. No locksmith lives nearby. We had to break the rear cab window and I crawled through to unlock the doors. I got a few small cuts, but what else was there to do? Bam…with a hammer on a truck that isn’t four months old, and my fat butt is climbing through glass with only the desire to touch my shivering, scared dear girls. Mike and I were handling this like two adults…yelling and swearing mercilessly at one another.
And AGC Automotive — you make some mighty strong glass, and why didn’t you give me a glass cutter for a retirement gift? Really.
Then…after all this excitement and Mike spending hours cleaning up the glass which shattered in the rear seat, me kissing on the dogs and reassuring them that they were fine, Mike not daring to come into the house where I was, I continued drying apples. Life goes on in spite of emergencies.
Here’s how apples look before you put them in the dedydrator…
And after you put them in the dehydrator…these are so sweet and chewy. And little!. I”m going to sleep in the dehydrator tonight. If these apples are any indication, I’ll be tiny tomorrow. And tanned!
I then put them through the sealer, and they are now in the freezer.
Done! Only six more baskets to go and one truck repair scheduled for Saturday. So far this week, I’ve taken out an iphone and Mike has taken out a truck window. We are 2 for 2. How ’bout them apples!!
I got up this morning and decided I wanted to participate in a “Linky Party” at Sarah’s (Thrifty Decor Chick). If you are coming over from Sarah’s, please leave me a comment. I’ll do the same for you!
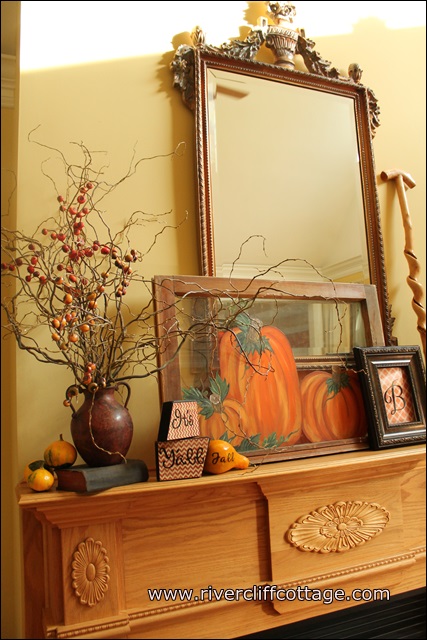
She’s invited bloggers to send links and photographs of their fall mantles. I knew I would go over and look at all of the mantles, so I thought “why not put mine in the mix?” Ugh. This created self doubt as I just walked around the house and used what I had for our mantle. I’d even already put it on the blog. (See post here) Is it good enough? I’m back in 4th grade wondering if I’ll get picked for softball! When does this go away?
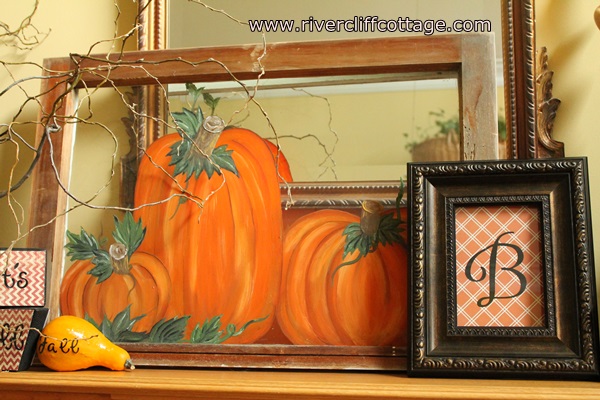
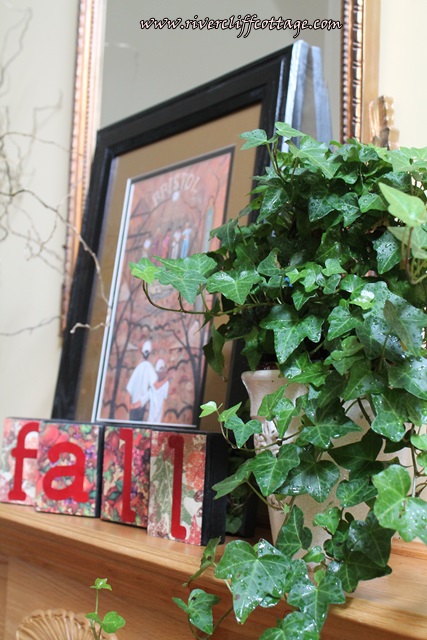
So this morning, I looked around the house a little bit more and tried to think of how to improve the mantle. Here’s what must stay. The willow branches that my friend and cousin Terri gave me.
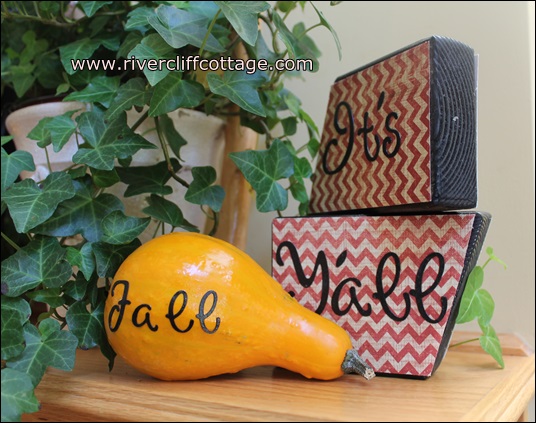
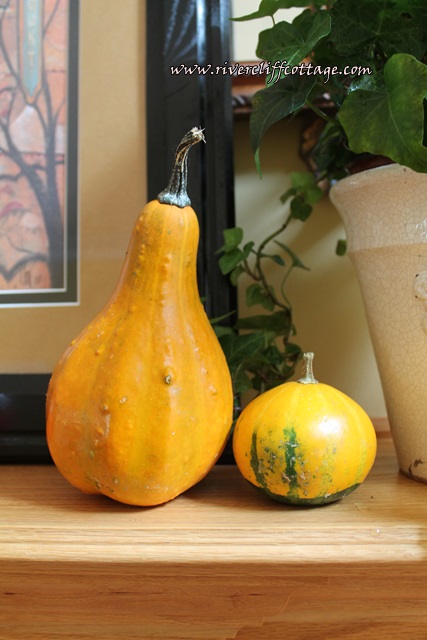
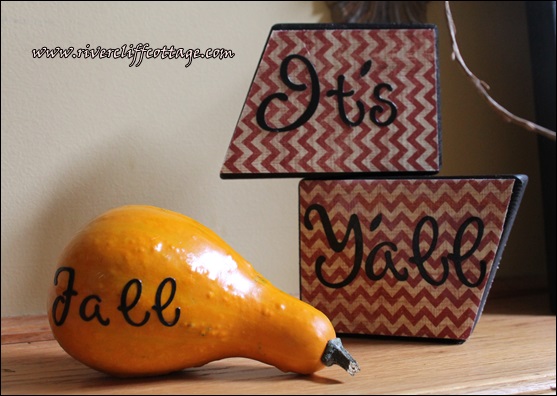
Gotta keep those cute little Mod Podge blocks and gourds from the garden…
The blocks are shabby and sweet and I turned them vertical. I’m also keeping that ivy. If you’ll recall, it’s in my blog header when it was a topiary. It was close to joining the compost pile in May when I sat it outside for a long summer vacation. It doesn’t look like a topiary now but I still like it.
I’ve removed the old picture and put up a painted window with pumpkins on it. Now that I think about it, that’s the only real change. Do you like it?
I stepped back and took a picture. Here’s the mantle..
It’s still missing something. Got any ideas?
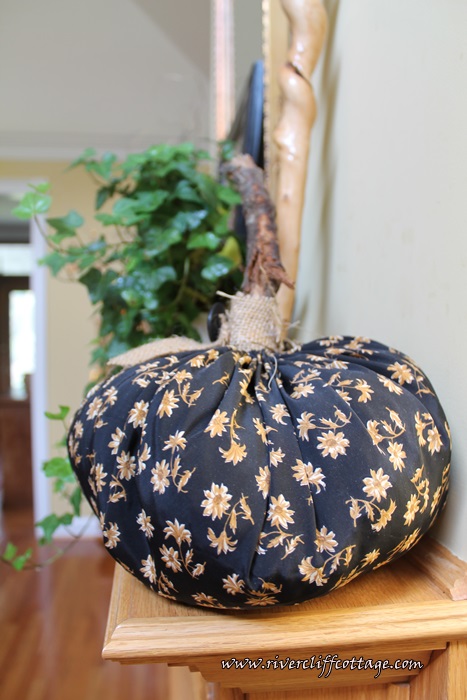
I decided maybe it needs some black. I put the first picture I had on this mantle a few days ago back in place, and I returned the black homemade pumpkin (stuffed with Walmart bags and pinto beans). Here it is. Whew…it almost looks like it did when I started. Have I wasted the entire morning fooling with this?
The walking stick always stays. My husband had knee replacement surgery, and the night before, a 17-year old friend, Neth, called and said “Mr. Beaule, I’m praying for you.” In the following weeks, he made the walking stick for Mike. How many teenagers would take the time to do this? Not many. When I look at the walking stick, I think of Neth’s face. God has a special plan for that young man.
As always, thank you for visiting RiverCliff Cottage. If you made a trip over from Sarah’s, I’ll be coming over to look and ooh and aah at your mantle tonight! Can’t wait!! Hope you have a wonderful fall.
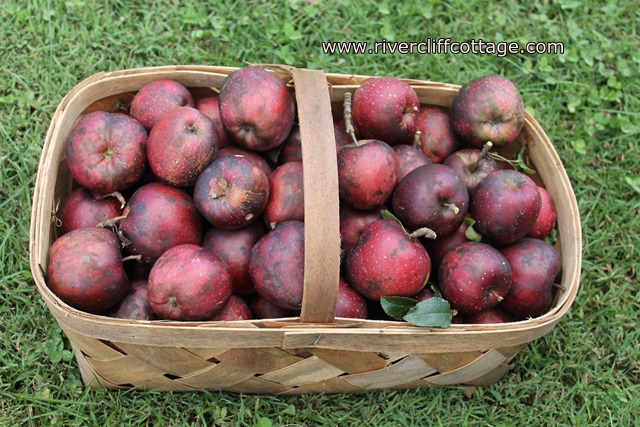
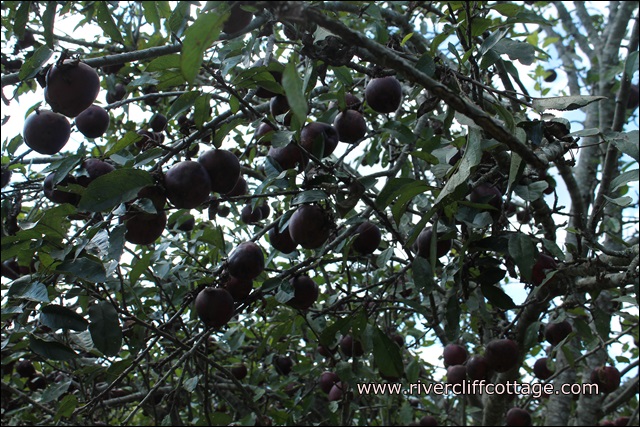
What if for some reason we had to revert back to a very simple life? Would we survive? In the country, we talk about these things…we like feeling secure. If that awful thing ever happened, I hope it’s a year like this past for our orchard. Pear, peach and apple trees performed spectacularly.
The trees are heavy with apples even after our deer friend, Suzie Q, has done her share of picking. She stands on her hind legs and whacks at the apples — I pretty much do the same, except in my case, the apples falll and hit me on the head. Suzie Q never seems to have this problem…what is your secret Suzie Q? We have three types of apples in the orchard, but today I picked Red Delicious. A week ago they looked ripe, but they had no flavor. That’s changed now. Very sweet and crunchy. We’ve not treated these trees in two years, so they are pretty much a la natural!! They are a very dark red.
I believe we can get at least two bushel baskets full of apples. Here’s a “peck”…at least that is what I think is a peck. I’ll have to ask Polly, since didn’t she pick a peck of pickled peppers? Maybe she knows something about apples as well as peppers.
I’m taking inspiration from these apples. I want to be like them. They are strong and determined. In spite of all the disease and bad things that can happen to fruit, they are happy, healthy apples! Their colors are also nice. They have deep reds, a tiny speck of gold here and there, black and then really green leaves and woody gray/brown stems. Benjamin Moore should be taking notes!
Now…on another note. Did I tell you I washed our granddaughter’s iphone? Yep. I’m so proud. It’s spotless. Grabbed the sheets off the bed and tossed them right in. With the phone bundled up inside. I should learn. Last year, I washed a suede boot which was mixed in with my jeans. The funny thing about the boot is that it looked better after the wash. The iphone? Not so sure on that one!
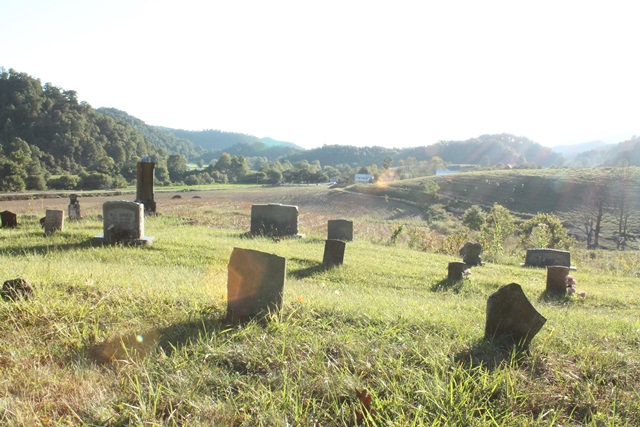
Mary McCroskey asked if I wanted to go take pictures today. Yes! She’s a good photographer, and she knows I need help. We headed out to two area cemeteries…the Hendrick’s Cemetery and the Mendota Cemetery.
The Hendrick’s Cemetery is surrounded by Steve and Mary’s property, so that’s where we went first. It is a beautiful place. Peaceful. I overexposed this picture a bit, but I like it that way.
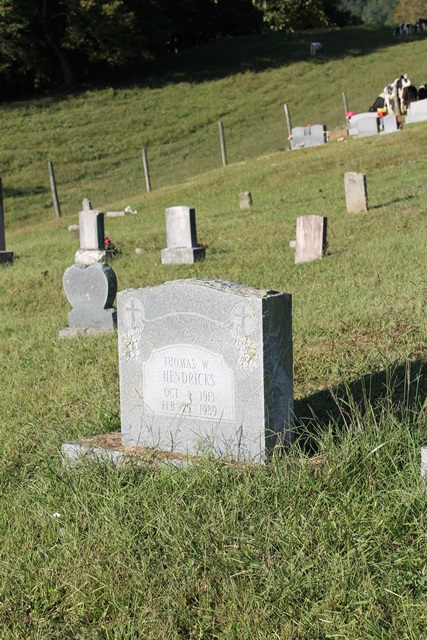
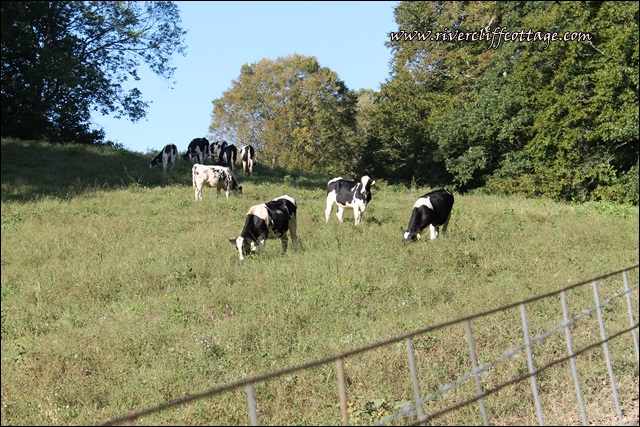
I visited the grave of one of my mother’s high school boyfriends. Hello Tom Hendricks. Tom remained a bachelor all of his life and was a good friend to my parents. Tom’s resting place is appropriate…his grave is in site of the house he lived in (which is now my friend Helene’s home) and he’s in view of Clinch Mountain, the North Fork, and the cows. If there was a tobacco patch nearby, the setting would be perfect.
The cows are used to quietness up here on the hill.
This must be a smart cow…her number is 2345. Hello cow!
Look! She laughed at me!
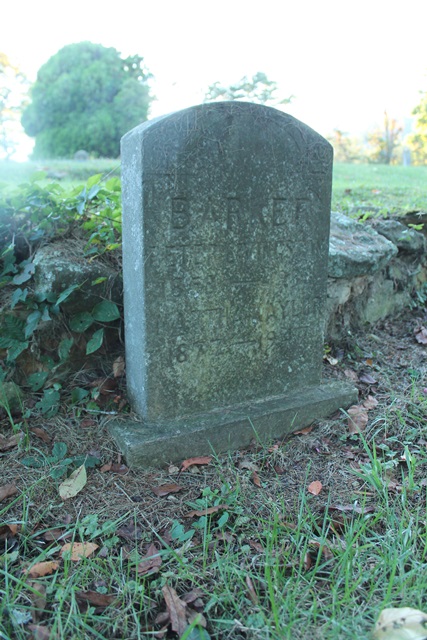
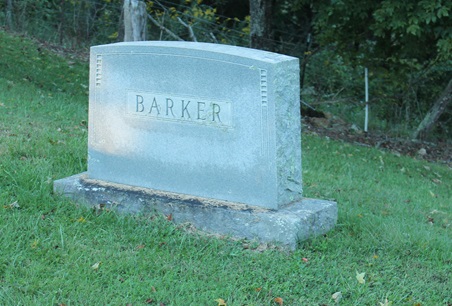
We also visited the Mendota Cemetery. I’ve included pictures of this cemetery before, but I was looking for something today. I’d written about Peter Livingston Barker several times (see here and here) , and I knew he was buried in this cemetery but I could not find his grave.
Today, I found it. Hello Peter Livingston Barker…Hello Grandfather!
There are lots of Barkers in this cemetery because there are lots of Barkers in Southwest Virginia. We moved to Ohio when I was nine years old. We had our first phone at that time! I recall looking in the phone directory for a familiar name but there were only 22 Barkers in all of Cincinnati! I could not believe that there were not a lot of Barkers in Ohio!! I made up my mind to get back to Mendota and soon! We didn’t last 24 months.
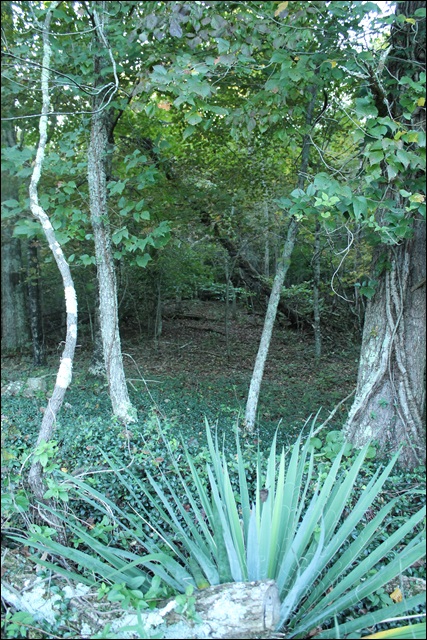
The Benfield girls (more lifelong Mendota friends), and I used to cut through the woods near the cemetery going to and from their house before and after school when I spent the night with them. Here’s the path…we used to walk it with our books on our heads.
This is my favorite picture from today’s visit. Mary–there might be hope for me!
Thank you for reading RiverCliff Cottage. During the past 4 weeks, this blog had a little over 1200 visits and 2500 page views. Thank you for doing whatever you are doing that encourages others to stop by. I greatly appreciate it!! XXOO Eva
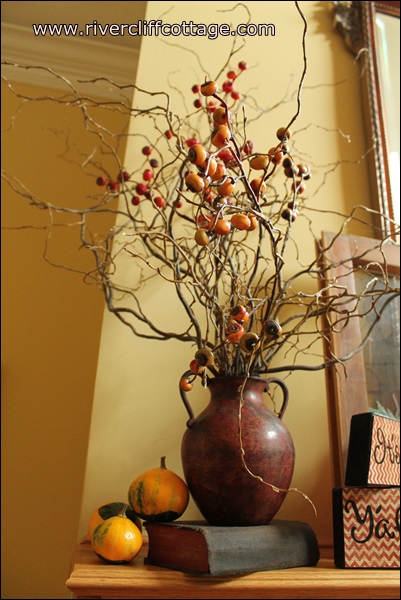
A few weeks ago, I started messing around with my mantle, and I put a vase up there with sticks. It was so sad. Here it is…
My cousin and forever friend Terri McCroskey came to the rescue. Very tactfully, she offered me some of her willow branches. I very gratefully accepted and went up to her house this week and picked them up. If you like this type of thing, you’re going to be jealous….here they are…I would almost call them “majestic” especially when comparing them to my sticks!!
I enjoy them every time I walk by…and I think of her sweetness in giving them to me.
I went shopping around the house and added a few other things. Mostly gourds and some blocks I already had. I think they look pretty good. Gourds from the garden…I didn’t have too many this year, but I did have a few.
I have an ivy topiary in my RiverCliff Cottage header. It’s dried up, died down and come back. It doesn’t look like a topiary any more but I think it’s still pretty. It was outside most of the summer recovering. I love a live plant on the mantle.
The blocks are kind of shabby….
Also on the mantle is one of last year’s pumpkins that cost me nothing. It’s full of Walmart bags and pinto beans!!
I also made a little vignette for the foyer with blocks and gourds. I made these upstairs in the loft when I swore to Mike I was cleaning. I really like them.
And here they are again…
Hope you have a wonderful fall weekend. I’m off to finish cleaning the house!!
When we did our Little Bathroom Project (see here if you haven’t read this), I wanted an updated look to the builder grade mirror that was glued to the wall without going to the trouble of removing the existing mirror. We decided to “frame out” the mirror using molding. If you’ve been reading about this project, you may be tired of it; but if you’re going to try a project like this, you should read on. It could save you some trouble.
We searched on the internet and found several success stories, but we also found some failures. My favorite blogger, because she is entertaining, resourceful, talented and funny is Rhoda of Southern Hospitality. One of Rhoda’s most popular posts is on the subject of placing molding on a mirror. She was successful. Here it is if you haven’t seen it.
The most difficult part of this project was getting that molding to stay in place long enough to dry and adhere to the slick mirror. We tried several things including Liquid Nails for Glass and for Mirrors. Gravity was working against us, and I did not want to spend the entire night in the bathroom holding up molding! The picture below was our first try. We mitered the ends on this try. Look at the top…it was sagging…and this was after all the work when we thought it was done!!! I said the crap word, and I won’t tell you what Mike said, other than it started with an “S”.
It actually fell down right after this picture was made and the ends got banged up, so we changed gears and used four blocks and four pieces of molding. More cutting and more painting. However, it was easier than doing the miter thing again, and we felt the blocks might add stability. Here it is again…with the blocks. I called these “ladies breast blocks” for obvious reasons.
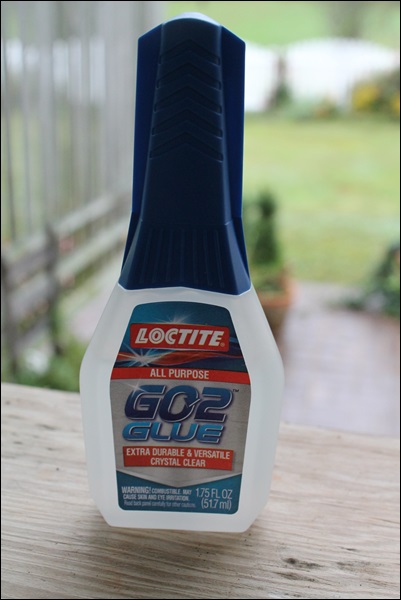
And now, here’s Mike’s solution to ensure that the molding that you’ve so carefully painted and cut will stay attached to the mirror! This can save you some heartache. He said no one should have to watch their pretty, mitered wood fall into the sink!
Mike came to the conclusion that there is not just ONE solution for effectively installing molding over a mirror. It is actually a two-fold solution — using TWO types of adhesive. One adhesive is for quick trying (hot glue) and the second for the strength to hold that mirror up for a long time. Both of these glues must dry clear because of the reflective quality of the mirror. Mike used about 80% Loctite GO2 Glue and about 20% glue from my cheap craft glue gun. This works!!
We were afraid to use only hot glue because it becomes brittle over a period of time. Have you ever used hot glue on something and it works fine for a few days and then things start falling off? With two types of adhesive, our molding was easy to place on the mirror (didn’t have to hold it up there forever) and should last. Here’s the pretty frame…
If you are not mitering your corners and use corner blocks like we did, put them on first. We also added a little tape until they were good and dry just as insurance. I did not want the block to come tumbling down and getting glue everywhere. These blocks offer support for those long, vertical and horizontal pieces that just want to fall down and make you cuss.
Last, and Rhoda mentions this…paint both sides of your molding when framing a mirror. We started this and only painted one side. When the molding was held into place on the mirror (simply holding by hand to see how it fit…not when we were gluing thank goodness!), the unpainted side actually reflected in the mirror.
Thank you for reading RiverCliff Cottage. If you read this and have questions, just email me!