Category Archives: navigation

Home improvement and craft projects

Organizing in Mendota!

We finally have our pantry put back together.  Naturally, it took longer than we thought. 

Here’s what it looked like before…

It was a bit of a mess.  We emptied the contents onto the dining room table and I wondered how we got all of the stuff into the pantry.  Most of the items are on the dining room table but not all!!

We then cleaned and painted the inside of the small pantry area, and Mike reworked the support system to keep the shelves from sagging.   And quickly days and days later, we put it back together.     I continued trying to use what I have CAUSE I’M NOT WORKING!!  I did want a few labels.  I’ve been wanting to buy a label  maker and I almost gave in to the urge.  I resisted.  Instead, I pulled out my trusty chalkpaint can (if you’ve been reading this blog you know how much I love this stuff), and I sprayed something I already had — jar lids.   I am a home canner, so naturally, I have lots of lids.   

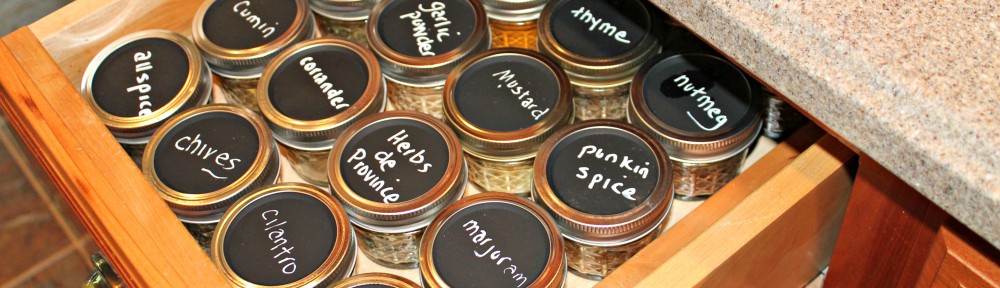
This opened up a whole new idea.  In addition to my pantry, I decided to create a spice drawer.  I had little jelly jar glasses because we did not pick berries this year and make raspberry jam.  (Thank you to Mr. & Mrs. Turkey and their turkettes who ate all my berries.)   I decided to repurpose these empty jars lying about as spice jars.  They were just the right height to fit in the drawer.

Check this out… I wish I had written the names on the jars neater but I was so excited I basically scribbled.   In fact, see that wet spot on the nutmeg…that would be drool! 

I have wanted a spice drawer for years.  Mike has offered to buy one, make one, etc, but for some reason, we just never got around to it.  Now, I’ve got one, and I didn’t pay anything for it.  

Here’s another close up of the little beauties….

I am envisioning all types of possibilities.   Interrupting thought…did I misspell any names above?    I could go down and organize Mike’s shop…or the garage…using chalkpaint and my new organization skills.  Or I could not do that.

So…back to the pantry. 

Here’s a picture of another way I used jar lids to identify what goes where in my old/new although still tiny pantry…

That shiny black basket was an old faded blue basket from 20 years ago in Franklin, Tennessee.  I bought it in my blue and mauve days when I decorated with baskets and geese and ruffled curtains.  I can’t believe I still have it! 

Here’s some larger jelly jars that I used for spices that were in bigger bottles.  Why didn’t I alphabetize them before taking this picture?

 I’d also read about chalkboard labels which can be purchased at Staples or Michael’s.  I decided to make my own using labels I already had. I just took them outside and gave them a quick spray of chalkpaint.  After drying about two minutes, I started writing on them. 

Here’s a shot of the labels….

  I use about six vinegars…they are all here in this little red box. 

Ok…it’s time for the pantry to be finished…

Here’s a comparison of the before and after. In just looking, there’s not that much difference.  The before is on the left and the after is on the right.  However, I can now find things!  

I know exactly what is in it and now Mike will know where to put groceries away that go in this pantry.  I have nine ketchups!  I can see them!

Also, the pantry has some additional utilitarian uses.  We have a spot for batteries, bags to be recycled and a fire extinguisher.  

I feel a sense of accomplishment on getting this task done.  Tomorrow it’s sewing day. 

Thanks for reading RiverCliff Cottage.     Please comment!    It’s not the prettiest pantry redo, but it’s an efficient pantry redo. 


Loading

I Love Chalk Paint

I am in love.  With chalk paint.   It’s less than $5 per can at Lowe’s.  

I went on a chalkboard tear today.     Do you recall this picture (below) which was in my dining room before we painted?  Oh look…who on earth allowed that cat to get on the kitchen countertop???

This was a nice picture but I needed a chalkboard for my kitchen.     I thought about selling the picture at a future yardsale, but that was before I discovered Chalk Board Paint.   Glass can be sprayed just like anything else, and this picture was just the right size for my new chalkboard.    

After taping the picture frame so it won’t turn to chalkboard too, we went down to Mike’s shop for spraying.   Mike got curious and just had to take over the spraying.  Here he is spraying two pictures that are destined to be future chalkboards.

I put two coats on each chalkboard.     Here’s one of the finished chalkboards….

We’re having a birthday celebration for our neighbor Helene.  We’ll prop this birthday chalkboard birthday card outside where everyone can see it.  It’s her first birthday in Mendota!

I made these little chalkboards (out of 4 x 6 and 5 x 7 picture frames) to let everyone attending the birthday celebration know that drinks are in one area and desserts in another area. 

The neatest thing is that they wipe clean. 

Here’s another chalkboard project…

This one is a little different.  The glass was chipped on a small 4 x 6 picture frame.  I needed some accessories for the foyer, and I wanted to use what I had vs. buying something. 

 So…I decided it was a candidate for a chalkboard with an initial on it.   My high tech work center was the yard and an old newspaper.   Could not be easier.

You can really see the broken corner in this picture.  I wasn’t sure it was going to work. 

But it did!  

Hope you have enjoyed my chalkboard projects.  Fun, cheap and easy.  

I’ll be returning with a new post on Monday.  What are your plans for the weekend?   I think we are getting a break on the much-needed rain we’ve recently enjoyed, so tomorrow will be a day to work in the yard.   I also want to push forward to getting the pantry back together. 


l

Loading

Pantry Project

This is my project today.   I’m organizing and cleaning the pantry.  I don’t want to run out and buy a bunch of organization stuff.  Actually, I do want to but I’m not going to because it’s not practical for me as I’m not working.  Plus…I have a lot of baskets and junk already. 

I had to empty the pantry to get started on this project.  Where do you think I put everything?

Remember that nice clean dining room table?  It was the perfect spot to unload everything from the pantry.    We got a bunch of those “half boxes” that Sam’s Club gives you at check out.  I was mortified when Mike got about 10 of the boxes on our last Sam’s Club visit.  We didn’t buy anythingWe just went in and he asked for the boxes.  I wanted to craw underneath the register and hide with embarassment, but the lady was really nice and gave them to him.  He carried the boxes out, and I followed about ten steps behind as if it was a coincidence that we arrived together and left together. 

I also used the dining room wine cabinet as a repository for all the spice stuff…with the California’s Finest Nectarines box we got from Sam’s Club. 

 My parents were raised in the Great Depression and their discussions about how bad it was affected me.  I must have several of everything.  An example is the 8 ketchups and 4 Miracle Whip Salad Dressings (I use it for potato salad).   I actually do like to keep about a 90-day supply of food on hand.   It makes me feel good.  I can also justify it by saying that we live 17 miles from a grocery store.   Right!

Look close…there are four ketchups at the front of the picture and to the left of the picture, you’ll see four more.   Ahhh…if the river floods and we can’t get out…we’ll drink ketchup.

There are very few canned or baking goods in this pantry.  I’ve got a “baking center” in one of the lazy susan cabinets in the kitchen, and I use the pull-out cabinets underneath the counter for canned goods that we purchase.  My home canned items are either on top of the cabinets or in another pantry area in our den.   The idea to put home canned items on top of the kitchen cabinets was not my idea.  I visited another Mendota friend, Amy Lou Statzer, and saw green beans on top of all of her cabinets.  I immediately copied her!   A shout out to Amy if she is reading this!

We’re painting the interior of this little pantry and reinforcing the shelving which sags.  I want to label the baskets and shelves in such a way that anyone unloading groceries will know where to put things.  

If you are reading this and you’ve organized a pantry, would you mind sending a photograph?   We’ll put the pantries of Mendota and southwest Virginia on the map!    I’ll post it along with my pantry…once it’s presentable. 

Thank you for reading this blog and thank you for sending comments.  The way the comment thing works is that I’m notified when a comment is waiting for moderation.    I’m notified on my aol acccount,  and when that little “ding” occurs, I stop whatever I’m doing and run over to see what you have said.  It’s so addictive. 

Loading

Guest House Bedroom and Quilts

Happy Saturday!  Another blazing hot day!   We are staying cool by staying inside today. I’ve been cleaning our kitchen from top to bottom–serious..scrubbing the cabinets, cleaning the inside of the cabinets, and even washing my jars of greenbeans that I keep on top of the cabinets.   I made the mistake of cleaning our self-cleaning oven today when it’s close to 100 degrees outside, and it’s been blowing hot air for over four hours.  Yuck  One hour left and it should be clean. Next time, I’ll do this on a cool day — winter!!

Mike and I have been pushing forward on our projects.   He has the dining room completely painted, and I’ve been painting the baseboards in the kitchen, and we’ll be installing new kitchen window treatments by Monday.   I’ll post pictures.   I hope they look good!

Finally, the guesthouse bedroom’s hardwood is down and while there are a few things remaining to be done, the room is essentially finished. It’s a very simple room, but I like the way it looks.  I stood in the closet and took this picture.

I just want to go over and crawl in that bed.  The room is so much cleaner than our main house master bedroom.   The hardwood floors that Mike installed make it look so fresh and neat. I painted the baseboard, and he made and installed the toe molding.  We didn’t even fight.  Much.

The quilt was made by a local Mendota quilter and friend, Joyce “Toby” Sproles.   She was actually a close friend of my mother’s (Leah Vivian Sproles Barker) and I went to school with her daughters (Lois, Sandy and Lisa).   She made it out of scraps, and I admire the artistry she used in putting the colors together.  I would not have known where to start!  It is perfect for this room, and everytime I see it, I think of Toby.  She has had some serious health issues, but she keeps on creating.   I want to get her picture with the quilt to add to my Quilt Project tab on this blog.   I hope to do that in the next week or two.  There is so much talent in this area.

I put some sheer curtains on the windows which were purchased at Walmart for a little less than $9.   At first I planned on buying a new black rod, but I decided to spray paint the existing rod (which is one of those real simple ones that cost about $1.00).    A new one might have looked a bit better, but I’d rather use what I’ve got and save the money.

The guesthouse is furnished with castoffs or extras, furniture that Mike has made, and a few things that someone had been intending to get rid of but gave to us instead.   I made most of the window treatments and throw pillows.  It reminds me of having a big dollhouse (until it’s time to clean it).   We are going to be working on the guesthouse during the next three months, and I’ll take pictures of the rooms as we work on them.

As you go into the guesthouse, which is really an apartment above the garage, you’ll run into another quilt.  It’s called Flower Garden, and my sister Nancy made it.  It was a Mendota Cemetery Quilt, and I won it during the raffle.  I bought a lot of tickets.

Pretty, Isn’t it?

I don’t mean to gush, but thank you to everyone reading this blog.  I love your coments.  Mike will look at me while I’m looking at my laptop and say “what are you grinning about?”  It’s you!  I’m reading your comments!   This has been so fun for me.

Loading

Patriotic Apron Giveaway

Mendota’s Katie Harris made this patriotic apron for some lucky little girl to wear.   If you’d like a chance to win this apron, just leave a comment to this post sharing your plans for Independence Day.  Simple!   Your comment must be submitted by 10 pm on Tuesday, July 3.  I’m downloading a little gizmo that will randomly pick one comment which will be the lucky winner.  I’ll notify the winner by email and on the post which will be placed online after 10 pm on Tuesday, July 3.  I’ll mail the apron to the winner.  Easy.  And fun!

On Saturday, Katie had her store open from 9:30 am until 5:00 pm.   The building has  been in her family for over 40 years.   I believe she is calling the store…”The Store.”    Here’s a picture…

I hope that at some time the store will be open on a regular basis, but at present, Katie opens it when she can…when she has some extra time.  When she’s there and the store is open, she occasionally provides refreshments.  Lemonade.  Muffins.  Beans and cornbread.  It feels like you are visiting someone in their home but you handle all of their furnishings and accessories!

I have history tied to the store.  When Katie’s father operated the store, he called it Benfield’s Store, and my mother worked there.  It sold sodas, bread, milk, gas…all of the things that a country story sold in the 1970’s.   The Benfield girls, Katie and Lisa, and I got off the  school bus at the store.   Mom would give me a bag of chips and a Ginger Ale which was in a small glass bottle at that time.   She’d ring me up with the old-fashioned cash register that went “Cha-Ching!”      After our snack, we girls would head to the back of the store and play Rook with our friends.   What memories!

Going back many years further, my father helped make the block for the original store site.  He was paid 10 cents per block.  I can imagine his hands…young at that time…working.    Here’s a picture.

Inside the store, there’s little vignettes of things Katie loves.   She’s uncomfortable charging her friends,  but I’ve assured her she’ll get used to it.  We want the store to be open, so we want to be customers as well as friends.

Getting ready for July 4…

Katie has an eye for making things pretty.  This kerosene lamp is a good example.  In Mendota, we all have kerosene lamps as our power goes off frequently.  As I write this, thousands are without power in Virginia following the June 29 storm.  I wonder…do they have kerosene lamps?

Here’s something that Katie and her grandson made.  It’s a birdbath made from a plate and a vase.  Very clever and a good project for little hands.

Also on Saturday, I continued working on my dining room.  It’s going nightmarishly slow…

Here’s another.  Looks like the Charles Manson murders took place here.

We are anxious to get this room done and put back together.  We had a delay because Mike went out of town this weekend to see the Atlanta Braves with his son and grandson.  He had a great time, and it was worth it, but it’s back to work!

Hope you enjoyed visiting The Store.  I also hope I have a new/old dining room tomorrow evening when I post.

Thank you for reading my blog.  I had over 50 views on one of the posts last week.   Many thanks!  Please forward this to anyone you think might be interested and keep it growing.  You have my appreciation.

Eva


Loading

Mendota Daily June 29

Thank you to everyone who has asked about my sweet girl Luckie.  She is doing better today.   Still quiet but she’s eating and keeping it down.  I felt so bad for her, and I wanted to do something, so I drove to town and bought a bunch of expensive dog food and treats.   This doesn’t make any sense, since we are having to leash walk her to prevent her from eating deer poop as indiscrimate eating is part of her problem!   Obviously, she doesn’t care where her food comes from if she’s eating poop and we know where that comes from.   It makes me feel better though.

While I was out getting Luckie’s food, I was on the Gate City Highway, turning left at the signal light toward the Bristol Mall when I saw the Google car!   First thing I thought about was rolling down the window so the camera could see me (my debut); and the second thing I thought about what — I want that job!

Back in Mendota, things are moving along.   The guest house bedroom now has hardwood.  Even with help from our friend Mark at the onset of the project, it was a very large job for Mike with an artificial knee and bad back and neck, but by doing a little each day, it’s almost done.  I LOVE IT!   Still needs paint and toe molding, but here it is:

The work on the hardwood and Luckie being sick gave us a late start on changing the dining room from red to terracotta.

But we have started!

In this picture, we’re brushing the corners and around the trim.  I’m loving the paint color.    It’s the same color as our Virginia clay.  However, what is happening as this dining room is being painted is that I’m realizing the decorative painting doesn’t look right.  It probably will have to go.

Yesterday we were supposed to have “Farm Day” at the Mendota LIbrary as part of the Summer Reading Program.  It was cancelled, leaving the Farm Girls who had planned on bringing goats, chickens and horses to the library with nothing to do.   So…we decided to paint…ourselves!

Margie made me into a butterfly.

Lisa’s beautiful daughter, Danielle with her favorite flower on her arm…

Sunflower Girl

Lisa and Danielle…scheming…

And the magnificant Margie…she can paint anything!

We’ll be visiting Margie and Lisa’s place soon…lots of critters!

I’m keeping cool this weekend…staying inside working on projects!  How are you staying cool?

Loading

Dining Room Project – Before

There won’t be a lot of DIY specific projects or recipes on this blog for a bit.  We are still in catch up mode!   We’re eating microwave popcorn instead of cooking and focused on the essentials–cleaning, organizing and freshening our house–room by room.   During the last two weeks,  we’ve worked in the foyer and in the yellow guest bedroom.   Today we started on the dining room which has remained the same since 1999/2000 when we first moved into our house.  “We” is my husband, Mike and me.  Retired Man.  🙂

My dining room is a good example of a room that is exhausted tired.  Good grief!  It has been bleeding dragon’s blood for over 12 years!!   I’m so not liking the red.   I recall how hard it was to get that exact look (Ralph Lauren Barn Red).   Here it is in all of its glory along with meaningless accessories:

To my comment on meaningless accessories, this room speaks so much to something that was just purchased and stuck on the wall.   My thoughts on what makes a well-decorated home have changed.  Ten years ago, I felt I had to fill up empty wall space.  Today, I wait until I find something that speaks to me.  The plates I like but not just stuck up there with the picture.  They are going to get a much needed rest.  Inside the hutch.

Here’s a good spot to explain the messy dining room table.  We’re doing projects all over the house!!  Just in this view, there is a bolt of fabric (guest house window valance), a Bible (getting ready for VBS at the end of July), an open laptop (blog), a closed laptop (work) and just the least bit of camera bag.    Feel like sitting down and eating a good meal?

Back to the room.   Below the chair rail, there is a trailing vine.  Here’s a picture (ignore my computer’s power cord).

It’s the Virginia creeper vine painted by the very talented Bristol artist, Lisa Snead.  I want to keep this area the same.  I live in Virginia and love most, if not all, things Virginian, so I’m wanting to keep the Virginia creeper vine.

The red paint will change out to one of Benjamin Moore’s Affinity colors called Moroccan Spice which is actually a  terracotta color.

See all of the paint chips?  I told Mike that I thought Moroccan Spice was the best choice and sent him out for what I thought would be the $3 sample paint pot.  He returned with a ~$50 can of paint.   I was shocked!  Even if it didn’t work, I’d have to use it.  However, it does work.  Sigh.Of.Relief.   Also, with the brushed spot, I noticed how good it covered the red so all’s well.

Back to the room again…I realize I may have a problem with wanting too many painted pieces of furniture in a room that I’ve also got artistic painting on the walls.   I’m living with that.

Here’s a piece I really enjoy:

This is the first piece of furniture Mike and I purchased.  We bought it in Nashville, Tennessee, and it was part of a breakfast set made by Pennsylvania House.  We thought we were high up.  Later, as our family moved, evolved and changed, we gave the table and chairs to our son and daughter-in-law, and they later gave it to their son.  I’m not sure where it is now, but it may well be something that went to Goodwill and was then snapped up by some DIY blogger with a quart of Annie Sloan Chalk Paint and is living the good life again!

More about the hutch.  Did you think I was going to tell you I did the artistic painting?  I wish, but NOT!!   Holly and Jim Thomas of Meadowview, Virgnia did this for me about 12 years ago.  They included some of the things I enjoy as part of my rural life including my wonderful kitty Miss Molly.   Loved her so much.  She lived to be 21.  Here she is reaching up to a bird’s nest:

 Might as well show you the top of the hutch above Miss Molly.

 I’ll probably have this hutch until I die.

Here’s something else I have in my dining room.  It’s a repurposed cabinet that housed a radio at one time.  Now it is….ta da….a wine cabinet!

I coveted it in an antique store in Middleburg, Virginia.    It was $750.  It might as well have been a gazillion dollars, because we could not afford it at that time.   When I finally got my husband to agree to consider buying it as a Christmas gift,  he went to the shop, and it was gone!  However, he learned that it had been there on consignment and after not selling, the cabinet had been taken to the artist’s house in Manassas, Virginia to be readied for auction.  A trip to Manassas and $300 later, it was mine.  I loved it in my townhome in Leesburg, Virginia (where we lived at the time), but I’ve never found the right place for it in this house.   I’ve stuck it in the corner of the dining room where it will probably stay for a while longer.

The dining room table which is piled with junk in this picture I’ll talk about separately on another post.  By the way, I do clean the house, and it is not usually this junky, but as I mentioned above, while we’re working on painting and sewing, I’ve not been very neat.  Sorry.    The only things I’ll say regarding the table at this time is that my husband made it for me and it is very special.   Definitely worthy of a separate post.

Window treatments are now down.   The room is taped and ready to go.   Surely it won’t take us a week to finish this paint job.

I’ll keep you posted:


Loading

Yellow Guest Bedroom Done! Finally!

A few days late, but the yellow guest bedroom is finally done.  Just a quick before picture:

Yellow Guest Bedroom Before Photo

If you’ll recall from my earlier posts, the room had become a place for us to put things that were in transition or we didn’t know what to do with.   Also, the window treatments were very cheap ones I’d got from Target.  Target has great stuff, but these looked bad  from the start.  Why did I leave them up for over 5 years?  They hung crooked and didn’t hide the blinds that are pulled behind them.   The blue and white checked duvet cover and Euro shams were fine, and I’ll use them again.  However, the cat threw up on the duvet and since it had to be removed anyway, I thought it was time for a change.    I always dread putting on a duvet.  It’s like wrestling a mean cat.

Enough of the past…let’s move to now!   Do you like it?

Minor changes, since I don’t have a lot of money to spend on this, and I still like the room.   It’s a cheerful room that, if I were a guest, I’d enjoy sleeping in.    I had the white battenberg duvet cover, the Euro shams and the quilt (which is now included in my Quilt Project Page.)    I still love the Sherwin Williams “Light of the Moon” paint color.   The only purchase I made was the $8.95 per yard fabric for the valances.

Here’s another view of the room.  Notice the very sweet little birdhouse table beside the bed?  My husband made that for me.

Yellow Guest Bedroom After Photo Corner View

My next projects will be in the dining room and kitchen.  Retired Man is still installing hardwood in the guest house bedroom, so I’ve lost my good help until that is done.  He has an artificial knee, bad back and achy neck so he isn’t going to move on that project very fast.  A bit each day.

I’m continuing to learn how to use this blog. I’ve learned that I should include my site name on photographs so I’m learning to using picmonkey.  I wasn’t sure if “rivercliffcottage.com” should be centered or on the corner.  I think it’s better on the corner.    Thanks for staying with me while I’m learning all of these new things.

It’s Saturday afternoon here in Mendota, and it is blazing hot.  I’ve got two snoring dogs beside me who I’m certain are wanting me to join them for a nap!


Loading

I Hate Miss Fentriss

My sister, Pat, and I lived in Norwood, Ohio briefly in the late 1960’s.  We attended Sharpsburg Elementary, and we each took Home Economics.  Pat was in the 8th grade; I was in the 6th grade.     Girls were required to take Home Economics and boys were required to take Shop.  It was the 60’s.

Anyway, there was an especially enthusiastic Home Economics teacher named Miss Fentriss.  I have no idea if she was a Miss or a Mrs. but it seems, in my sister’s recollection, that sewing was the most important thing in Miss Fentriss’ life so I am making an assumption that she was married to her Singer sewing machine.

I had a bit of hyperactivity (Mom called it energy)  in the 6th grade–I barely remember  Home Economics.  I do recall making a blue apron that had a very poorly installed zipper pocket in the front.  I gave it to one of my 6th grade boyfriends to give to his mother for Mother’s Day.  I can only imagine what the surprised woman thought when she received the gift.   “Was the poor child who made this blind?”

My sister took the class seriously.  I still member the very fashionable navy and yellow polka dot culottes she made.  (Now there is a word you don’t see often…culottes).   She knows how to sew and enjoys it.   Later in life when she attempted to teach me to sew, Miss Fentriss’ name began to enter our conversation.

My sister would say in her most school teacherish voice, “Miss Fentriss would do it this way,” or “Miss Fentriss would always clip her threads” as she smugly clipped her threads and ensured her lining wasn’t slipping,

If you have read my previous post (here), you know that I planned one day for making the most simplest of valances and cleaning up our yellow guest bedroom.  It did not go well.

However, I have not been lonely during this process.  Nosiree!   I’ve been besieged by Miss Fentriss’ presence.  She hovers, loiters and whispers “tsk…tsk…what a mess!”   She is especially upset that I did not line the valances.  I started to line them, but I found that the drapery fabric was 54″ wide and the lining fabric was 48″ wide, so I’m short lining fabric, and I live 20 miles from the store.  Forget it.   I’d like to smack whomever made that rule about varying widths.

It’s 9:40 pm.  I went and picked up the fabric this morning but I didn’t get started on making these valances until late this evening.   I’m close to having two valances (unlined) made but the room is a wreck, and Chrissie the Cat is trying to knock stuff off the table.   And I hate Miss Fentriss.

I’ll post the fixed up yellow guest bedroom tomorrow.


Loading

Yellow Bedroom Redo Mess

Ughhh….. I will not have the curtains done for the yellow guest bedroom today.   I have had some minor setbacks…all of which are my fault.

1)  It took me about 45 minutes to remember how to thread my machine.

2)  Following the threading of said machine, I googled “making a valance with a rod pocket.”

3)  Following reading said instructions, I determined that 2.5 x the width of the window would make awfully bunchy valances, and I opted to use a single width of 54 inches for our standard window.    Very.Big.Boo.Boo.

It looks like this:

Now, I will have to return to town and buy another two yards of fabric. I’ll ensure that the pattern matches up and start from scratch. Tonight, I’ll get the lining ready. In the meantime, I have to leave out the sewing mess.

I hate it when I do things like this.  I have also got a cold if that can be used as an excuse.

Also, if you are reading this, would you mind leaving me a comment?    I need to make sure my comments are working and the new view counter is working that was added last night.

Thank you.


Loading